Sunday 31 October 2010

More Denami Christmas

Finally we have got some gorgeous Autumn colour here in the south east of England.  I had to take a trip out to The Glitter Pot and The Craft Barn in order to pick up some supplies yesterday and it was amazing to see the difference from when I did this same journey only a week previously.  On that occasion most of the trees were still green with only the odd one having turned colour but this time around all the trees had their Autumn colours on display and looked glorious.  I was beginning to think that perhaps they had forgotten how to do it but thankfully they didn't let me down!!  With all this talk of Autumn I really should be showing you some Autumn cards but I still haven't done any and don't think I'll be getting around to it so instead here are some more of those Denami Christmas cards that I made.

First up is this one using the Elegant Floral Wreath as my main image which was stamped with a gold inkpad and embossed with Gold Twinkle embossing powder.  Merry Christmas (which I think is a Printworks stamp)was then stamped in the middle of it using a Starlite Black Brilliance inkpad. On the silver pearlescent card I stamped and embossed the Elegant Floral Leaf Sprig and a snowflake using a silver inkpad and silver embossing powder. On white Bazzill I stamped snowflakes in silver and stamped and embossed the Large Dot Swirls to create a border.

The wreath was coloured using the Zig Brushable pens.

For this next card I stamped the Elegant Floral Wreath and the Merry Christmas wording with Starlite Black Brilliance and then die-cut it with one of my Nestabilities Labels dies. On the silver card I stamped and embossed the Elegant Floral Blossom using a silver inkpad and silver embossing powder and on the black Bazzill Bling card I stamped the Elegant Floral Arch with a white StazOn inkpad.  The punched out flowers are from the Hydrangea Martha Stewart punch.

And once again the colouring was done using those Zig Brushable pens. You can probably just make out I used my trick again of using my glue pen along with silver embossing powder to add the silver dots to the middle of the top flower. (I quite like this card and am hoping perhaps to make some for me to send out at Christmas this year if I get time!)

And here's that wreath again! This time stamped and embossed in silver and cut out. Before mounting onto a Nestabilities Scalloped Circle, I wrapped silver ribbon around the wreath and secured the ends to the back of it. Merry Christmas was stamped with white StazOn as were the snowflakes on the black Bazzill Bling strips of card. The main card was stamped using the Elegant Floral Vine and Starlite Black Brilliance and the flowers were punched using the Hydrangea Martha Stewart punch with silver pearls added to the centres.

As you've no doubt guessed the wreath was coloured using Zig Brushable pens but this time I used a very light green Brushable to colour in the background of the wreath to make it more 'wreath like'.

Well that's all from me today!!  I hope you like the cards.  All the stamps used on these cards are by Denami Design except the Merry Christmas stamp which I think is Printworks.  All of the stamps and materials can be bought from Stamp Addicts.

Thursday 28 October 2010

A Few Cards To Show You

Hi guys.  I've got quite a few cards to show you today!  These are what I made a little while ago back in August for the Stamperama show using some of the new Christmas stamps by Denami Design.

First up is my lilac and black creation. For this one I stamped the main image (Elegant Floral Circle) with Starlite Black Brilliance and coloured it with Zig Brushable markers. (These markers are double ended with a light colour on one end and a corresponding shading colour on the other.) Then I stamped Elegant Floral Arch with the same inkpad onto White Bazzill Bling card and Snowflakes onto Black Bazzill Bling card using white StazOn.

Once assembled I used a glue pen and silver detail embossing powder to add silver embossed dots onto the dotty circle and into the middle of the flowers and heated it with a heat gun. This gave me some nice metallic accents.

For this card I once again used the Elegant Floral Circle but this time I stamped it with a Gold Encore inkpad and embossed with Gold Twinkle embossing powder before colouring in with the Zig Brushable pens.  You can't see if very well but I also stamped and embossed a small vine stamp and a snowflake stamp onto the pearlescent silver strip of card and once again stamped the snowflakes onto the Black Bazzill Bling card using the white StazOn inkpad.

Here's a closer look at that main image.

And lastly here's another take using that Elegant Floral Circle using a Gold Encore inkpad and Gold Twinkle embossing powder again and some different coloured Zig Brushable pens.  For the background I stamped and embossed a snowflake and the Elegant Floral Leaf Sprig using a Silver Encore inkpad and Silver Detail embossing powder onto silver card and then used a white StazOn inkpad to stamp the same sprig randomly onto Black Bazzill Bling card.

I really like these colours of pens as I think it makes the flowers look rather Christmassy.

As I mentioned at the beginning of this post all the stamps used are by Denami Design and can be purchased from Stamp Addicts as too can the Brushable markers.

Next time I'll show you another batch of cards that I made along this same theme using some of the other Denami stamps.

By the way believe it or not these are actually quite quick cards to make as the layers are kept to a minimum and the colouring of these simple but effective images is also really quick to do.

Monday 25 October 2010

It's Christmas!!!...........

.................well ok not literally!  It's just my way of telling you that I thought I'd show you a Christmas card!  This is one of the cards that we made last time I was at The Glitter Pot using this cute Merry Bear stamp from the Laurence Collection by StampAvie along with some Penny Black Christmas Stamps - Starlit (the tree), Winter Whites and Greens (snowflakes and wording) and Snow Scroll.

The background was created by stamping the tree and snowflakes using Moonlight White Brilliance ink and the embossed snowflakes were done using the Crafts Too Snowflakes embossing folder.  All of which are available from The Glitter Pot.

No prizes for guessing that I coloured in my main image using my trusty Copics.  (Sorry can't tell you the colours I used this time as it isn't fair to those that paid to attend this class!)

For anyone that is interested in doing a Christmas based Copic class I am back again at The Glitter Pot on Saturday 13th November where we will be doing this sort of blended colouring in the morning using some cute Christmas stamps and in the afternoon I'll be teaching my new technique using Copics called Resist Watercolour.  (Look out for my Snowman project coming up in the December issue of Craft Stamper which shows this technique.)  Click here for more details on the classes.

Then on Saturday 20th November I am at The Craft Barn using Copic markers again along with the new Sarah Kay and Penny Johnson Christmas stamps. (These Craft Barn classes will be limited to a maximum of 8 people so that I will be able to devote more time to each person so you will need to book quite soon to avoid disappointment as these classes tend to be quite popular!) Click here for more details on the classes.

Lastly but certainly not least my thanks to everyone who booked on my classes this Saturday (just gone) at The Craft Barn - it was lovely to see you all and I am so pleased that you enjoyed the classes! Hope to see you again soon!

Friday 22 October 2010

Allsorts Bingo Challenge

Today I thought I'd enter one of my cards into the Lets Play Bingo Challenge over on the Allsorts Challenge Blog.  This is one that I made for The Craft Barn's June Extravaganza Weekend using the Sisters stamp by Belles and Whistles along with flourishes and wording from my own Fancy Flourishes stamp sheet. From the Bingo selection I have chosen Pearls, Mist/Stickles and Ribbon.

I have used two of my Martha Stewart punches on this too - Floral Vine and Monarch Butterfly as well as a Stormy Sky Distress inkpad for all the blue stamping.

For my main image I stamped onto watercolour card with black Versafine and watercoloured my image using Distress inkpads and a water brush. The inkpads I used were Spun Sugar, Stormy Sky, Bundled Sage, Shabby Shutters, Mustard Seed, Brushed Corduroy, Antique Linen and Tattered Rose.

Here's a closer look at my watercolouring attempt!  I definitely still prefer my Copics but I guess it is good to try and master other stuff too!

To finish off the card I sprayed it with a pearl glimmer mist and then added touches of glitter glue which doesn't show up very well from these photos but trust me it is there!!

All products used came from The Craft Barn.

Talking of challenges - today is the start of a brand new challenge over on The Stamp Man's Challenge Blog so you may like to head on over there and see what they've got in store for you this time!!

Have a great weekend and for those of you who are booked onto my classes tomorrow, I'll see you VERY soon!!  By the way, talking of classes I have updated My Event Diary in my sidebar to include the dates and details for my November and December classes.

Tuesday 19 October 2010

The Stamp Man Blog Hop Winners

Just to let you know that all the winners have now been announced over on The Stamp Man's Challenge Blog for our Altered Letters Blog Hop.

The winner of the prize I was offering of the AOD No.46 Rob and Rosie un-mounted stamp sheet is

SUE THE IRON

Congratulations Sue! If you would like to go to the Challenge Blog you can find out how to claim your prize and for those of you who took part in the blog hop you also might like to head on over there to see if you won one of the other prizes!!  You only have 7 days to claim your prizes so don't delay!!

Thursday 14 October 2010

Oh My Goodness!!

Where does the time go???  I cannot believe that it has almost been a week since I last posted anything!! Sorry everyone.  There's just so much upheaval here at the moment and the days just disappear before I realise!

So without further ado here is a card for you!!  It has been so long since I've entered a challenge but I thought that I would enter this card into 
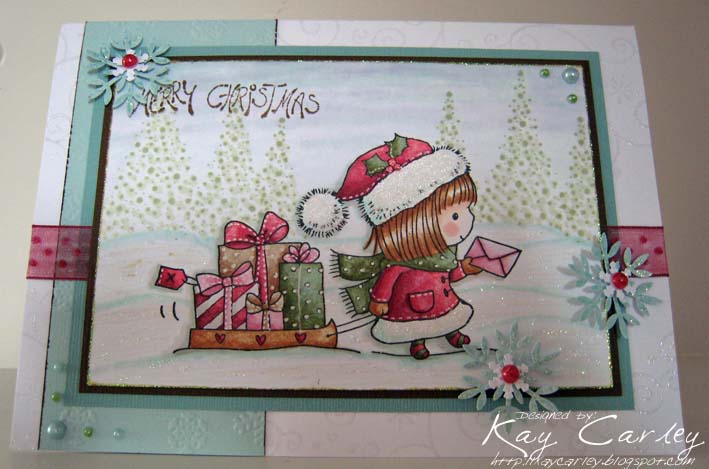
The Penny Black Saturday Challenge Week 122 as I've used all PB stamps on this card.

You probably can't tell very well from the photo but I embossed the main card and blue/green panel using my Cuttlebug along with a Crafts Too snowflake embossing folder.  The ribbon did start out white but I coloured it with one of my red Copics to match my image and the snowflakes are a combination of a Martha Stewart punch (Glacial Snowflake) and a Woodware snowflake punch.

For the main panel I stamped my girl image (Gift of Giving) with black Memento onto Digital Smooth Cardstock (from Craftwork Cards) and onto a Post It note to act as a mask. I next coloured her with Copics popped my cut out Post It note mask over her, tore a piece of paper to act as a further mask for the snow area and then inked the tree stamp up (Starlit) with a Bundled Sage Distress inkpad and stamped it along the panel making sure to overlap the trees now and again. These were then lightly coloured with a G40 Copic marker.  The sky and snow areas were also done with Copics and a Copic Blender pen and then the wording (from Winter Whites and Greens) was stamped over the top with a brown inkpad.

Copic Colours
Skin - E11, E00, E000 and R20 for cheek
Hair and Sleigh - E99, E35 and E50
Clothes and presents - R59, R37, R35 and 0
                                   G99, G94 and BG11
                                   E35 and E50
                                   R85 and R81
                                   E47, E43 and E41
Snow - W3, W1, BG11 BG10 and 0
Sky - B63, B60, W1. B000 and 0

All Penny Black stamps, Copics and general materials used came from The Glitter Pot apart from the Digital Smooth card which came from Craftwork Cards.

Friday 8 October 2010

The Stamp Man's Autumn Challenge

Hi guys.  Today is the start of a fresh new challenge over on The Stamp Man's Challenge Blog which is Autumn!  Here is my offering -

I created the backgrounds for the card using Tattered Rose and Shabby Shutters Distress inkpads then stamped Branch Songster along the bottom of the larger panel using Walnut Stain and my leafy flourish (from my Fancy Flourishes stamp sheet) around the edges of the top half using Dried Marigold and Frayed Burlap Distress inkpads. For the smaller panel I stamped Autumn Flower with Walnut Stain and coloured the leaves wtih a gold metallic pen and the acorn with Copic Spica markers.

If you hop on over to The Stamp Man's Challenge Blog you can see what the other design team members came up with and find out details on how to enter the Autumn Challenge.

Hope you all have a good weekend!

Thursday 7 October 2010

Mouse Mischief

I thought I'd stay with the Spring/Summer theme and show you this card that I made for one of my Glitter Pot demos.  The background paper is by Basic Grey and you can see on the background of the card that I added some soft stamping using one of my flourishes from my Fancy Flourish stamp sheet. (The wording is from this sheet too.)  The flowers are by Prima (Glitter Pot) and the leaves were punched.

For the main panel I used stamps from the Penny Black Make A Wish clear stamp set - just love this particular set!  These were stamped using Tuxedo Black Memento ink and coloured using Copics.

Copics used were -
Teddy - E37, E35, E31, E30 and C7 for his nose
Mice - E35, YR23, E31, E000 and R20 for cheeks
Urn - C5, C3 and C1
Daisy Flowers - Y17, Y11, V15, V12 and V000
Dandelions - BG11, BG10 and Clear Spica
Greenery - YG63 and G20
Grass - YG06, YG03 YG00 and G40
Background - B63, B60, C1, V000 and 0

All of these materials used on this card are available from The Glitter Pot.

Here's a closer look at some of the colouring.

Hope you like it!

Sunday 3 October 2010

What's A Girl To Do?

Hi guys.  Well I've had a trawl through all my cards that I still have to show you from when I was just too busy to actually post them up and they are either Spring/Summer cards or Christmas cards!!  I've got nothing inbetween suitable for Autumn so I'm afraid that you will have to bear with me as we go leaping around the seasons on this blog!!

For today I thought we would visit Spring/Summer and show you this card that I made earlier this year for one of my classes at The Craft Barn.  (At least I think it was a Craft Barn class!!)  This was using one of my older stamp sheets called Flitters and Flutters which is full of dragonflies and butterflies in different sizes along with some leafy sprigs and appropriate butterfly and dragonfly wording. 

Do you know it has been so long since I did this card that I had to look in my notebook to see what inks I used to create this!!  So I can now tell you that I used Bundled Sage and Frayed Burlap Distress inkpads to create the background for this card and then stamped it using different stamps off of the Flitters and Flutters stamp sheet, so that the leafy (background) sprigs perfectly correspond with the leafy sprigs in the dragonflies wings.

The dragonflies themselves were stamped onto white card using Tuxedo Black Memento ink and coloured using Copics.  (Here's a better look at one of them for you.)

Copic used were -
RV34, RV10 and RV000
G94, YG11 and 0.

And here is the other card that we created using the remainder of that background paper, complete with inky smudge from me picking it up with inky fingers!!  Oops!!

Friday 1 October 2010

Especially For You

Well it seems as if Autumn is now upon us!  The trees are starting to turn colour and some of them are dropping their leaves now.  Infact as I write this the road outside is covered in yellow leaves - very pretty!

This is one of the cards I made earlier this year for The Craft Barn's June Extravaganza Weekend using the Beary Big Hugs Belles 'n' Whistles stamp along with my Retro flower punches which I just love!

The image was stamped onto watercolour paper using black Versafine and then watercoloured using Distress inkpads. The writing (from my Fancy Flourishes stamp sheet) was stamped using Brushed Corduroy  and the panel was distressed with Antique Linen. 

Hope you all have a good weekend.